The Battle of Hoth: a critical analysis
How the Empire made critical errors and allowed the Rebel Alliance to escape, and the lessons we can learn from it
A number of years ago, I pitched a project to the folks at the official Star Wars website: a series of articles that examined the various battles that you see in the films and TV shows as though they were real history: an in-universe history paper that sought to explain and convey some clarity on the action that we saw on screen.
That column never went anywhere – what I pitched and what the site's editors wanted ended up being too far apart. But the idea stuck with me and I ended up telling other people about it, and somewhere along the way, the idea for a book about Star Wars and military strategy emerged. That book is Strategy Strikes Back: How Star Wars Explains Modern Military Conflict. Edited by Max Brooks, John Amble, M.L. Cavanaugh, and Jaym Gates (along with an introduction by Stanley McCrystal) and it's an interesting look at the field of military history and strategy through a pop-culture lens. Its table of contents is full of people who you might recognize if you're in this particular sphere of military strategists, like Max Brooks, General Mick Ryan, Steve Leonard, B.J. Armstrong, Admiral James Stravridis, August Cole, John Spencer, and a bunch of others.
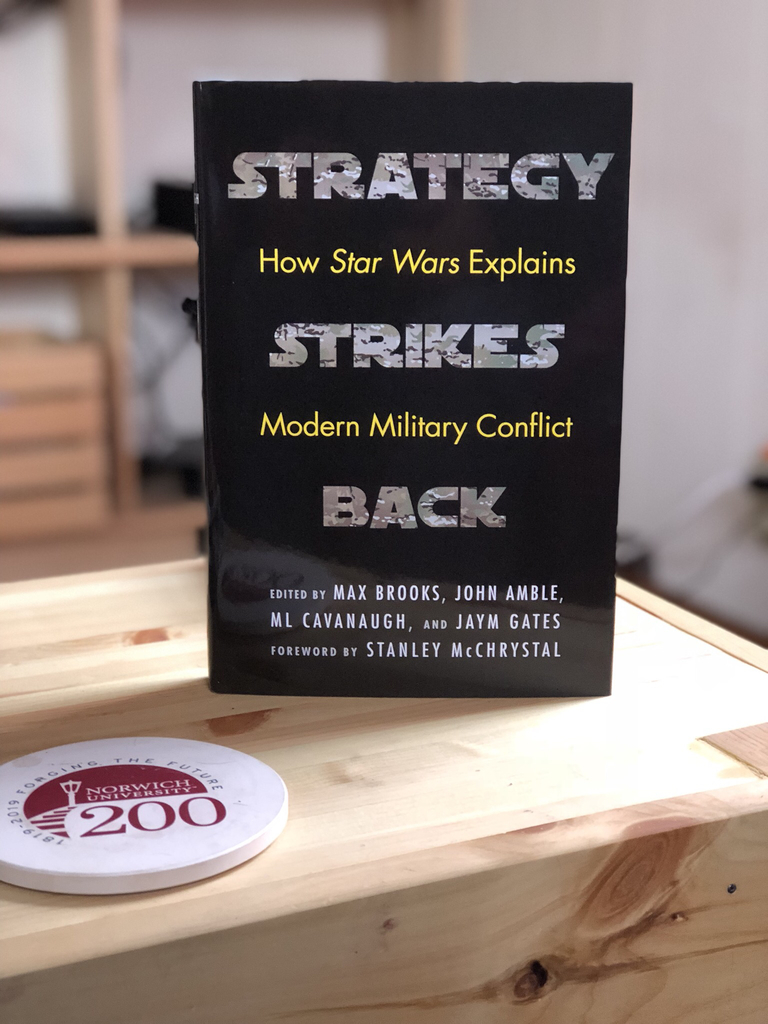
I contributed a piece to it, something I'd written up while thinking about this project, an overview of the Battle of Hoth from The Empire Strikes Back. It was a fun piece to write and it became the 19th chapter in the book. Here it is:
With the destruction of the Imperial Death Star during the Battle of Yavin, the Rebel Alliance established itself as a formidable opponent against the Empire. However, despite their victory, the Alliance found itself facing two major problems: a new, serious effort by the Empire to track down and eliminate the threat that the Alliance posed and an inability to stand toe-to-toe against the Empire.
The Battle of Hoth provides an excellent case from which to examine the mindset of Alliance leaders during this critical time. By examining the assault on a newly established headquarters and the reaction from Rebellion commanders, it’s clear that the leadership from the Alliance commanders and the dedication of the soldiers on the battlefield are what helped keep their movement from collapsing, while they were aided by critical military errors on the part of the Empire's armed forces.
Setting the Stage
Forced to abandon its central headquarters on Yavin 4, the Rebel Alliance now had to locate a suitable home base from which to plan their operations while broadly withdrawing from the center of the galaxy. With Imperial forces redoubling their efforts to locate the Alliance command structure, Rebellion commanders had to contend with inhospitable choices.
Alliance commanders selected a planet in the Anoat sector, Hoth. Because of the planet’s inhospitably cold temperatures and massive asteroid belt, they believed that the largely uninhabited planet would likely be overlooked by Imperial surveillance.
With all the meteor activity in this system, it’s going to be difficult to spot approaching ships. - General Rieekan
The Rebellion tasked the construction of their new headquarters to General Rieekan. Under his watch, soldiers used native tauntauns to patrol the surrounding areas and to set up a sensor system to detect Imperial equipment. To further bolster the base’s defenses, they also installed a costly V-150 Planet Defender surface-to-orbit ion cannon, which would allow the base to defend itself from direct orbital attacks. To complement their defenses, a small squadron of modified T-47 airspeeders was assigned to the base.
As the Rebel Alliance worked to reestablish their headquarters, Darth Vader and the Imperial forces under his command began a massive search to locate the Rebellion’s core leadership. The task force was commanded from Vader’s own Super Star Destroyer by Admiral Kendal Ozzel. To aid their search, they began deploying thousands of Viper probe droids, which would autonomously search planets and report back their findings to Vader’s task force. One such probe was deployed to the Hoth system, where it began to seek out any signs of the Alliance.
Prior to the Battle of Hoth, a key figure in the Rebellion, Luke Skywalker, went missing, attacked by a native life-form. The disappearance forced Rebellion technicians to accelerate the efforts to adapt the t-47s for flight, allowing them to join the search-and-rescue operations the next morning and giving the pilots a chance to test out the aircraft.
Echo Base’s control crew picked up movement on the new sensor system and quickly ruled out native life-forms and Rebellion personnel before identifying it as an Imperial probe droid, which then self-destructed.
The information was received aboard the Executor and reviewed by Captain Firmus Piett and General Maximillian Veers, each of whom believed the information was a solid lead in their search.
We have thousands of probe droids searching the galaxy. I want proof, not leads. - Admiral Kendal Ozzel
Piett noted that the Hoth system was supposed to be devoid of human life. Vader, upon seeing the information, ordered the task force to deploy to the Hoth system and ordered Veers to begin preparing his units for an assault.
This appears to be a critical moment for the failure of the Imperial forces to ultimately stop the Rebellion at this point in the war. With the self destruction of their probe—the Empire’s only intelligence asset on the planet—the Empire was now limited in the amount of information that they had from the planet. Rather than deploy further intelligence assets to the planet, Vader ordered an immediate deployment of the task force to Hoth.
Following the discovery of Echo Base, the Rebel Alliance began their evacuation, anticipating the imminent arrival of the Empire’s forces. The base had a small fleet of gr-75 medium transports at their disposal for transporting equipment and personnel, along with a squadron of Incom T-65b X-Wing starfighters for escort duty. Due to the short amount of time available to evacuate, the Alliance had to come to terms with abandoning much of the heavy equipment installed on the base.
Rieekan’s decision to abandon the newly established base was met with some skepticism—the base had only just been completed, with a considerable amount of equipment installed. Ultimately, his caution proved to be the deciding factor in the survival of the Alliance.
The Battle
With the arrival of the Imperial task force, Rieekan ordered the activation of the base’s energy shield. With the forces arrayed overhead unable to bombard the base, he was able to effectively dictate the course of the battle by forcing the Imperial military to fight on the ground, without air support from TIE fighters or bombers. This not only allowed him to task his X-Wing fighters for escort duty but also bought him time to continue the evacuation. The Imperial task force (which included the Executor, the Tyrant, the Devastator, and the Avenger) dropped out of hyperspace in close orbit over the planet Hoth. As Vader had ordered an immediate redeployment, Ozzel followed his orders, assuming that the Rebel forces would be quick targets from orbit.
However, the lack of information about the disposition of the Rebels foiled these plans. Echo Base had already anticipated the arrival of the Imperial task force and prevented them from carrying out a routine orbital bombardment. It was at this point that the Empire lost the ability to effectively end the Rebellion. Ozzel was executed for his error, thus depriving the task force of its most senior flag officer.
Despite the setback, Vader’s task force had been designed specifically for the actions that followed in orbit. The smaller Imperial II–class destroyers’ maneuverability would allow the Imperial forces not only to capture escaping vessels but to contend with any additional armed threat that the Alliance might field.
As it turns out, Rebel forces were woefully understaffed for such an escape; troop transports would be escorted by a single pair of X-Wing fighters tasked with running interference with Imperial fighters.
Despite the disparity in force projection on the battlefield, the Alliance base did have an asset that they could use to aid their escape: the V-150 ground-to-orbit ion canon. Due to the Empire’s rush to arrive at Hoth, their knowledge of Rebellion assets was next to nothing, and they arrived at the battlefield not knowing the state and disposition of Rebellion fighters. Their lack of knowledge about the Alliance’s ground-to-orbit assets became a critical weakness for the task force.
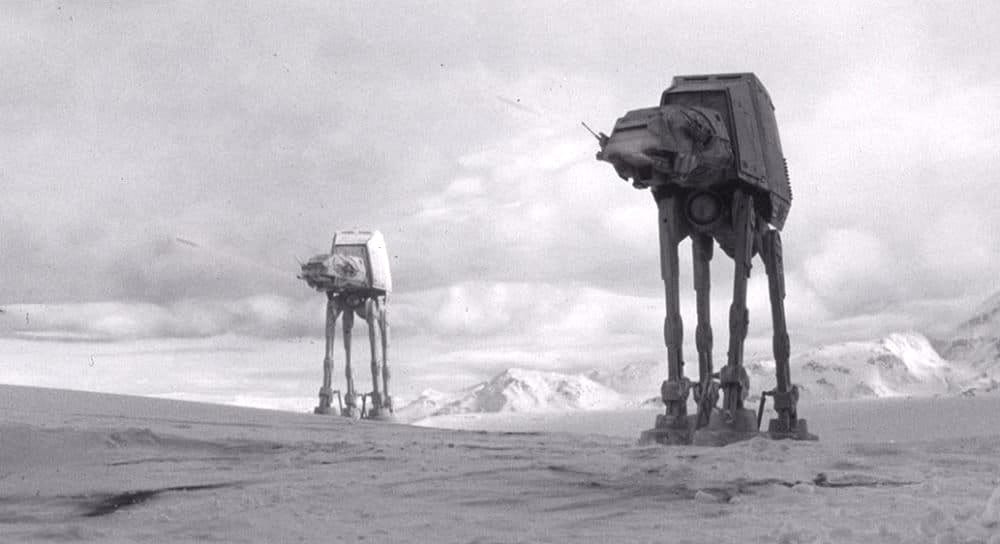
The first transport lifted off from the planet’s surface, followed by a pair of salvos from the v-150. The blasts targeted the Tyrant, the Star Destroyer covering the ship’s escape vector, disabling it and leaving a hole in the Impe rial blockade. Rebel troopers cheered as they learned of their comrades’ escape, which provided a major morale boost to the soldiers on the ground. The lack of knowledge about the Alliance forces on the ground likewise led General Veers to certain tactical decisions. His primary target was to destroy the base’s power generators, which in turn would eliminate the shield protecting the base. To this end, he landed a squadron of All-Terrain Attack Transports (AT-AT), along with an All-Terrain Scout Transport (AT-ST), beyond the shield. With the shield up, it is clear that he only anticipated meeting resistance from ground troopers, as fighter assets would be utilized for escort duty. Additionally, the planet’s climate made fielding aircraft difficult—something that the Rebellion had only accomplished in the rush to locate a missing pilot.
Rieekan had already identified the power generators as a primary target and deployed his forces accordingly: Rebel soldiers from the 61st Mobile Infantry’s Twilight Company manned hastily prepared trenches, backed by heavy stationary weapons.
On the ground, Veers’s armored forces attacked Rieekan’s ground troopers, targeting the heavy guns between them and the power generator. As they approached, Rieekan scrambled his T-47 squadron to provide air support for the 61st Mobile Infantry. Despite the heavy armor protecting the AT-AT walkers, Rogue Squadron was able to exploit a critical weakness; using tow cables, they undermined the legs of at least one walker, while another was destroyed by a pilot who had been shot down. Despite their innovative use of equipment, the squadron was quickly depleted.
Yes, Lord Vader, I’ve reached the main power generators. The shield will be down in moments. You may start your landing. - General Veers
The Rebels’ combined use of ground and air power, coupled with the lack of battlefield intelligence, was not enough to stop Veers from advancing and ultimately destroying Echo Base’s power station, but that wasn’t their primary objective.
What the members of Rogue Squadron and the 61st Mobile Infantry were able to accomplish was to slow the incoming armored forces enough to allow the rest of the Rebellion forces to escape into orbit. As Veers deployed his snowtroopers, Organa issued the order for the remaining ground forces and base personnel to board the last transport.
Aftermath
While Veers was ultimately able to destroy the power generator and occupy the base, he did so at great cost; he lost several of his heavy walkers before reaching the Rebellion’s lines and took further casualties as he entered the base. Furthermore, the task force itself suffered from major losses in orbit; the loss of one Star Destroyer at the onset of the battle demonstrated the cost of Imperial confidence in their tactics, while another Destroyer was heavily damaged in the pursuit of the remaining Rebel commanders in the asteroid belt.
Despite the high cost to the Imperial forces, the cost to the Alliance was equally high, but not catastrophic; while they took numerous casualties on the battlefield (in both personnel and equipment), they were able to escape with their command structure largely intact. What could have been a major blow to the Rebellion became a mere battlefield loss.
The loss of a permanent headquarters meant a setback in the Alliance’s ability to command their forces on the battlefield and to plan a larger strategy for winning their fight against the Empire. Additionally, the loss of critical weapons, equipment, and personnel would further impact the ability of the Rebellion to continue its military operations in the short and long terms.
It was the work of the commanders on the ground on Hoth, as well as errors by Imperial commanders, that prevented the loss from ending the Rebellion completely. Rieekan’s prudent measures to abandon the newly completed base saved numerous lives and preserved what equipment could be evacuated from the base. Admiral Ozzel’s decision to drop his task force near the planet within sensor range allowed the Rebellion not only to push forward their evacuation plans but to devise a quick defensive plan that helped hold off Imperial ground forces to evacuate the remaining personnel from the planet and regroup with the rest of the Alliance fleet, where they began to plan their next moves.
Thanks for reading! One of the things that I've actually had in drafts for this newsletter for years is a similar piece about the Battle of Scarif from Rogue One that I've gotten outlined, but not written out. I should revisit that...
Andrew